
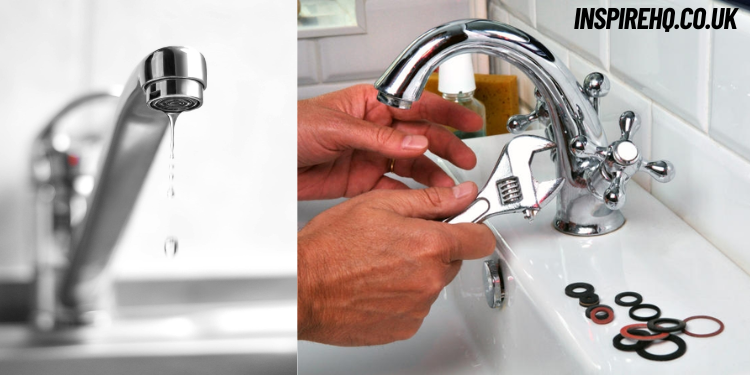
A leaky faucet may seem like a small problem, but over time it can lead to significant water waste and increased utility bills. If you’ve ever experienced the constant drip-drip-drip sound keeping you up at night, you know how annoying it can be. But don’t fret! Fixing a leaky faucet is a manageable DIY project that can save you both time and money. In this comprehensive guide, we’ll walk you through the step-by-step process of How to Fix a Leaky Faucet, from identifying the cause of the leak to gathering the necessary tools and completing the repair yourself. Whether you’re dealing with a single-handle, double-handle, or ball-type faucet, this article has got you covered.
Why Should You Fix a Leaky Faucet?
Before we dive into the how-to, let’s first take a look at why it’s so important to fix a leaky faucet as soon as possible.
Save Water, Save Money
A leaky faucet can waste a surprising amount of water. A drip from a faucet can waste more than 3,000 gallons of water per year, which not only puts unnecessary strain on local water supplies but also adds to your utility bill. Fixing the leak promptly will help conserve water and keep your monthly costs down.
Prevent Further Damage
If left untreated, a leaky faucet can lead to more significant plumbing issues, such as corroded pipes or mold growth in the surrounding areas. By addressing the issue early on, you prevent these secondary problems from arising, saving you the cost of major repairs.
It’s Easier Than You Think
While plumbing might seem like a complex task, fixing a leaky faucet is often simpler than you’d expect. With just a few tools and some basic knowledge, you can handle the job yourself and avoid the need for a plumber.
Common Causes of a Leaky Faucet
To effectively fix a leaky faucet, you first need to understand the potential causes of the problem. Different types of faucets may have different issues, but here are some common causes of a leaky faucet.
Worn-Out Washers
In compression faucets, the most common cause of a leak is a worn-out washer. The washer is responsible for sealing the valve, and over time, it can wear out or become damaged. When this happens, water leaks from the spout or handle.
Damaged O-Rings
O-rings are rubber seals that help prevent leaks around the faucet handle. If the O-ring becomes cracked or damaged, water can leak out. This issue is common in faucets with a cartridge mechanism, which is often found in newer designs.
Corroded Valve Seats
The valve seat is the part of the faucet that connects to the spout. Over time, it can become corroded due to mineral buildup, leading to leaks. If your faucet has a rust-colored stain or a significant amount of buildup around the valve, this could be the culprit.
Worn-Out Cartridge or Stem
In cartridge-style and ball faucets, the cartridge or stem may wear out over time, causing water to leak from the spout or handle. This is particularly true if the faucet is frequently used or not maintained properly.
Mineral Deposits
If you live in an area with hard water, mineral deposits can build up inside your faucet and cause leaks. These deposits can affect the faucet’s components, leading to poor performance and leaks.
Tools You’ll Need to Fix a Leaky Faucet
Before you begin, make sure you have the right tools for the job. Here’s a list of essential tools you’ll need to fix a leaky faucet:
- Screwdriver: A flathead or Phillips screwdriver, depending on your faucet type, will be required to remove the faucet handle.
- Adjustable Wrench: Used to loosen nuts and bolts that hold the faucet in place.
- Needle-Nose Pliers: Useful for gripping small parts, such as washers or O-rings.
- Replacement Parts: Depending on the issue, you may need new washers, O-rings, cartridges, or valves.
- Plumber’s Tape: Used to seal any threads and prevent leaks.
- Plumber’s Grease: Helps lubricate moving parts and extend the life of your faucet.
- Cloth or Towel: To protect the sink surface and prevent parts from falling into the drain.
Step-by-Step Guide to Fixing a Leaky Faucet
Now that we’ve covered the basics, let’s dive into the steps involved in fixing your leaky faucet. These steps will vary depending on the type of faucet, so we’ll provide instructions for different styles.
Step 1: Turn Off the Water Supply
Before you start, make sure the water supply is turned off. This is the most important step in any plumbing repair. Locate the shut-off valves under the sink and turn them clockwise to close. Once you’ve done that, turn on the faucet to drain any remaining water and relieve any pressure in the pipes.
Step 2: Remove the Handle
The next step is to remove the handle from the faucet. For most faucets, this involves unscrewing a decorative cap on the top of the handle and then using a screwdriver to remove the screw holding the handle in place. If the handle is stuck, use a pair of pliers to gently wiggle it loose.
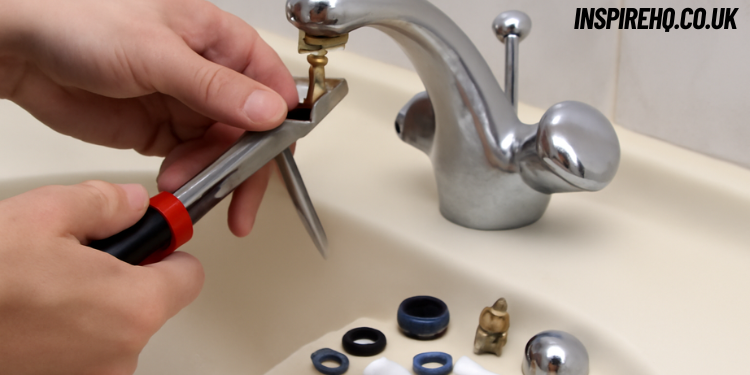
Step 3: Inspect the Faucet Parts
Once the handle is removed, inspect the inner components of the faucet to identify the cause of the leak. Check the washer, O-ring, or cartridge for any visible damage or wear. If you notice any corrosion or mineral buildup, clean the parts with a soft cloth or brush.
Step 4: Replace the Faulty Parts
If you’ve identified the problem, it’s time to replace the faulty parts. For washers, simply remove the old washer and replace it with a new one. Make sure the new washer is the correct size to ensure a tight seal.
If your faucet uses a cartridge, remove the old cartridge and replace it with a new one. You may need to use a wrench to loosen the cartridge if it’s tightly secured. Be sure to match the new cartridge to the old one to ensure compatibility.
Step 5: Reassemble the Faucet
Once the new parts are in place, it’s time to reassemble the faucet. Put everything back in the reverse order, starting with the cartridge or stem, followed by the handle. Tighten all screws and bolts securely but be careful not to overtighten them.
Step 6: Turn on the Water Supply and Test the Faucet
After reassembling the faucet, turn the water supply back on. Slowly open the faucet and check for any leaks. If the leak persists, double-check the parts to ensure they are properly installed.
When to Call a Professional Plumber
If you’ve followed all the steps and the faucet is still leaking, it may be time to call a plumber. There are a few reasons why this could happen:
- The faucet may have a more complex issue, such as a corroded valve seat or damaged internal components.
- You might not have used the right parts, or the faucet may require specialized parts that are difficult to find.
Preventing Future Leaks
Once your faucet is fixed, it’s important to take steps to prevent future leaks. Here are some tips:
- Regularly Clean the Faucet: Clean the faucet components every few months to remove any mineral deposits or debris.
- Install a Water Softener: If you live in an area with hard water, installing a water softener can reduce mineral buildup in your pipes and faucets.
- Check for Wear and Tear: Periodically check your faucet for any signs of wear or leaks. Replacing parts early can prevent more costly repairs down the road.
Conclusion
Fixing a leaky faucet may seem daunting at first, but with the right tools and a little know-how, it’s a project that you can easily tackle on your own. By following the steps outlined in this guide, you’ll be able to stop that annoying drip and restore your faucet to working order in no time. Not only will this save you money on your water bill, but it will also prevent more significant plumbing issues in the future.
If you’re ever unsure about the repair or the leak persists despite your efforts, don’t hesitate to call a professional plumber. But for most common leaks, this DIY fix will do the trick and give you the satisfaction of solving the problem yourself.
FAQs:
1. Why is my faucet still leaking after I replaced the washer?
If your faucet continues to leak after replacing the washer, the issue might be with another component, such as the O-ring or the valve seat. It’s also possible that the new washer was the wrong size or improperly installed. Double-check all parts for wear and ensure they are correctly fitted.
2. Can I fix a leaky faucet without turning off the water supply?
No, it’s essential to turn off the water supply before attempting any faucet repair. This prevents water from flowing while you work and reduces the risk of flooding or damage to the plumbing.
3. How can I prevent mineral buildup in my faucet?
To prevent mineral buildup, consider installing a water softener if you live in an area with hard water. Regularly clean faucet components with a vinegar solution to remove any deposits and keep everything running smoothly.
4. How do I know if I need a new faucet instead of just replacing parts?
If your faucet is very old, has extensive corrosion, or you’ve already replaced several parts without success, it may be time to consider replacing the entire faucet. A new faucet will likely be more efficient and prevent ongoing repair issues.
5. Can I fix a leaky faucet myself, or should I call a plumber?
In most cases, fixing a leaky faucet is a simple DIY task that you can handle with basic tools. However, if the leak persists after replacing parts or you’re dealing with a more complex faucet, it’s best to consult a professional plumber.
Also Read: Who Is Lisa Wayans? The Quiet Sister Behind the Wayans Legacy

